A Comprehensive Guide to Azure Stack HCI Storage Replica

Imagine a world where a hardware failure or natural disaster cripples your business-critical applications. Shudders, right? Thankfully, Azure Stack HCI offers a built-in hero: Storage Replica. This disaster recovery (DR) technology empowers you to create synchronous or asynchronous copies of your storage volumes across geographically dispersed sites. Let’s delve into the world of Azure Stack HCI Storage Replica, equipping you to safeguard your valuable data.

Understanding Storage Replica: Replication Magic

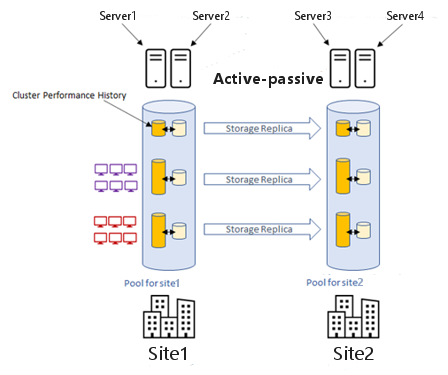
At its core, Storage Replica facilitates volume replication between servers or clusters. This enables automatic failover of virtual machines (VMs) in case of a disaster at the primary site. Here are the two main replication options Storage Replica offers:

  • Synchronous Replication: This real-time mirroring ensures data consistency at both sites. Every write operation at the primary site is immediately replicated to the secondary site, offering minimal data loss potential (perfect for critical applications). However, this approach requires a low-latency network for optimal performance.
  • Asynchronous Replication: This method allows for some lag between primary and secondary site data. While offering greater flexibility (suitable for geographically dispersed sites), asynchronous replication introduces the possibility of some data loss during a disaster (depending on the configured replication interval).

Benefits of Utilizing Storage Replica

The advantages of leveraging Storage Replica in your Azure Stack HCI environment are undeniable:

  • Disaster Recovery: The primary benefit is robust disaster recovery. In the event of a disaster at the primary site, VMs can be seamlessly failed over to the secondary site, minimizing downtime and data loss.
  • Improved Business Continuity: By ensuring application availability, Storage Replica safeguards your business continuity. Critical operations can resume quickly, minimizing disruptions and potential financial losses.
  • Scalability and Flexibility: Storage Replica caters to diverse deployment needs. Synchronous replication provides high availability for critical workloads, while asynchronous replication offers flexibility for geographically distant sites.

Planning and Implementing Storage Replica

Before deploying Storage Replica, some planning is crucial:

  • Identify Critical VMs: Prioritize the VMs that require replication for optimal disaster recovery.
  • Network Assessment: Evaluate your network latency and bandwidth to determine the suitability of synchronous or asynchronous replication.
  • Storage Sizing: Factor in the additional storage requirements for replica volumes at the secondary site.

Implementation Tools:

There are two primary tools for implementing Storage Replica:

  • Windows Admin Center: This user-friendly interface provides a visual representation of your Storage Replica environment. You can create and manage Storage Replica groups, volumes, and monitor their health status.
  • PowerShell Cmdlets: For granular control and automation, PowerShell offers a robust set of cmdlets for Storage Replica configuration, monitoring, and failover operations. Here are some key cmdlets to get you started:
    • New-SRGroup: Creates a new Storage Replica group, specifying the primary and secondary servers/clusters.
    • Add-SRVolume: Adds volumes to the Storage Replica group for replication.
    • Set-SRPartnership: Configures replication settings like synchronous/asynchronous mode and replication interval.
    • Start-SRReplication: Initiates replication between the primary and secondary sites.
    • Get-SRGroup: Retrieves information about the health and status of your Storage Replica groups.

Implementation Steps:

  • Create a Storage Replica Group: Use Windows Admin Center or the New-SRGroup cmdlet to define the primary and secondary servers/clusters involved in replication.
  • Select Volumes for Replication: Identify the volumes containing the critical VM data using Windows Admin Center or the Add-SRVolume cmdlet.
  • Configure Replication Settings: Choose the replication mode (synchronous or asynchronous) using Windows Admin Center or the Set-SRPartnership cmdlet. For asynchronous replication, set the replication interval to determine how often updates are sent to the secondary site.
  • Enable Replication: Once configured, initiate replication using Windows Admin Center or the Start-SRReplication cmdlet to begin mirroring data to the secondary site.

Day-to-Day Operations and Monitoring

Storage Replica offers robust management and monitoring capabilities to ensure the health and effectiveness of your DR solution:

  • Windows Admin Center: Provides a centralized view of your Storage Replica environment, allowing you to monitor replication health, view detailed information about volumes and groups, and perform basic management tasks.
  • PowerShell Cmdlets: Offer extensive control for monitoring and managing replication. You can use cmdlets like Get-SRGroup to retrieve detailed information about replication status, identify errors, and troubleshoot issues.
  • Azure Monitor Integration: Integrate Storage Replica with Azure Monitor for in-depth insights. Set up alerts to be notified of potential issues like replication failures or performance bottlenecks.dd

Testing Failover: Practice Makes Perfect

While prevention is key, testing your disaster recovery plan is crucial. Here’s how to test failover functionality with Storage Replica:

  • Planned Failover: Perform a planned failover to the secondary site during a maintenance window. This allows you to validate the failover process and ensure VMs can be successfully activated at the secondary site. You can initiate a planned failover using Windows Admin Center or the Invoke-SRFailover PowerShell cmdlet.
  • Test Failover with Hyper-V Replica: If you’re using Storage Replica in conjunction with Hyper-V Replica for VM replication, conduct a combined test failover to simulate a complete disaster scenario.

Conclusion: Building a Resilient Azure Stack HCI Environment

By leveraging Storage Replica’s capabilities, you can create a robust disaster recovery strategy for your Azure Stack HCI environment. With planned replication, comprehensive monitoring, and regular testing, you’ll ensure business continuity and minimize the impact of potential disasters. Remember, data protection is paramount, and Storage Replica empowers you to become the guardian of your critical information.

Additional Considerations

  • Security: Implement robust security measures at both primary and secondary sites to safeguard your replicated data. This includes encryption for data at rest and in transit.
  • Network Bandwidth: Monitor network bandwidth consumption, especially during initial replication and failover events. Ensure your network has sufficient capacity to handle replication traffic without impacting production workloads.
  • Resource Allocation: Factor in the additional storage and compute resources required at the secondary site to accommodate replicated VMs during a failover event.

By following these guidelines and leveraging the power of Storage Replica, you can build a highly available and disaster-resistant Azure Stack HCI environment that keeps your business applications running smoothly, no matter what challenges arise.

A Deep Dive into Azure Stack HCI Storage QoS

Azure Stack HCI offers a compelling hyperconverged infrastructure solution, but keeping all your virtual machines (VMs) in perfect harmony requires careful management of storage resources. Enter Storage Quality of Service (QoS), a powerful tool for ensuring predictable performance and prioritizing critical applications. This blog delves into the planning, implementation, and management of Storage QoS in Azure Stack HCI, empowering you to become a storage performance maestro.

Planning Your Storage QoS Strategy

Before diving into configuration, a well-defined plan is key. Here’s what to consider:

  • Application Needs: Identify your VMs’ storage I/O requirements. Mission-critical databases and real-time applications typically demand higher priority and guaranteed IOPS.
  • Workload Analysis: Analyze your VM workloads. Are there predictable spikes in I/O activity at specific times? Understanding usage patterns helps tailor QoS policies effectively.
  • Baseline Performance: Establish baseline storage performance metrics (IOPS, latency) before implementing QoS. This provides a reference point to measure the impact of your configuration.

Tools of the Trade: Implementing Storage QoS

While Azure Stack HCI lacks a native GUI for QoS, PowerShell commands offer granular control. Here’s your toolkit:

  • New-StorageQoSPolicy: This cmdlet creates a new QoS policy, specifying a descriptive name and optionally a description for clarity.
  • Add-StorageQoSPolicyAssociation: This command associates the newly created policy with specific VMs or VM groups. You can target VMs by name, IP address, or other identifiers.
  • Set-StorageQoSPolicy: This cmdlet allows you to configure the policy itself. Here’s where the magic happens:
    • Minimum IOPS: Set the guaranteed minimum IOPS for VMs assigned to the policy. This ensures they receive a baseline level of performance.
    • Maximum IOPS: Define the maximum IOPS limit to prevent any single VM from consuming excessive bandwidth and impacting others.

Real-World Example: Prioritizing Database Performance

Let’s say you have a VM running a critical business database. You want to ensure it receives consistent performance, even during peak usage periods. Here’s how to implement QoS:

  1. Create a Policy: Use New-StorageQoSPolicy to create a policy named “Database_Priority”.
  2. Associate the Policy: Run Add-StorageQoSPolicyAssociation -PolicyName Database_Priority -VMName DatabaseVM to associate the policy with the “DatabaseVM”.
  3. Configure the Policy: Use Set-StorageQoSPolicy -PolicyName Database_Priority -MinIops 1000 -MaxIops 2000 to set a minimum guaranteed IOPS of 1000 and a maximum limit of 2000 for the database VM.

Beyond PowerShell: Monitoring and Optimization

PowerShell provides the foundation, but a complete QoS solution requires ongoing monitoring and adjustment. Here are some additional tools:

  • System Center Virtual Machine Manager (VMM): While VMM doesn’t directly configure QoS in Azure Stack HCI (yet!), it offers valuable storage performance monitoring capabilities.
  • Azure Monitor: Leverage Azure Monitor for in-depth insights into storage performance metrics like IOPS and latency. Set up alerts to notify you of potential bottlenecks.

Fine-Tuning Your Storage Orchestra

Remember, QoS is an ongoing process. Regularly monitor performance metrics and adjust your QoS policies as needed. Here are some best practices:

  • Start Conservative: Begin with moderate IOPS limits and gradually adjust based on observed performance.
  • Monitor and Refine: Continuously monitor storage performance and refine your policies to optimize resource allocation.
  • Test Changes: Implement changes in a controlled environment before deploying them to production.

Conclusion: Conduct Your Own Performance Symphony

By implementing Storage QoS with careful planning and the right tools, you can ensure your Azure Stack HCI environment functions like a well-conducted orchestra. Prioritize critical applications, manage resource allocation, and monitor for optimal performance. With a little practice, you’ll be a storage performance maestro in no time!

Storage Technologies for Azure Stack HCI and Storage Spaces Direct

The ever-evolving IT landscape demands innovative solutions that bridge on-premises infrastructure with the power of cloud computing. Enter Azure Stack HCI and Storage Spaces Direct (S2D) – game-changers for hyperconverged infrastructure (HCI). But what fuels these powerhouses? Let’s delve into the storage technologies that underpin S2D and Azure Stack HCI, empowering you to make informed decisions for your specific needs.

The Heart of S2D: Supported Storage Options

S2D offers flexibility when it comes to storage hardware, allowing you to leverage a variety of options to tailor your HCI solution:

  • Direct-Attached SATA (SATA HDDs): A cost-effective choice for large-scale capacity requirements. However, slower performance compared to other options.
  • Direct-Attached SAS (SAS HDDs and SSDs): Delivers a balance between cost and performance, ideal for mixed workloads demanding both capacity and speed.
  • NVMe (Non-Volatile Memory Express): Blazing-fast performance for demanding applications like real-time analytics and high-performance computing (HPC). Ideal for read-intensive workloads.

Beyond the Basics: Storage Optimization and Erasure Coding

S2D goes beyond just supporting various storage devices. It employs advanced storage optimization techniques to maximize performance and ensure data resiliency:

  • Storage Tiering: Frequently accessed data resides on high-performance SSDs, while less-used data is stored on cost-effective HDDs. This optimizes resource utilization and overall performance.
  • Caching: S2D utilizes caching to store frequently accessed data in memory, further accelerating access times for critical applications.
  • Erasure Coding: This technique distributes data fragments across multiple storage drives, providing redundancy and fault tolerance. In case of a drive failure, data can be reconstructed from remaining healthy drives, ensuring data availability.

Choosing the Right Storage Mix: Considerations for Optimal Performance

The ideal storage configuration for your S2D deployment depends on your specific workload requirements:

  • For cost-sensitive, capacity-heavy workloads: Prioritize SATA HDDs with storage tiering to optimize performance for infrequently accessed data.
  • For balanced performance and capacity needs: Combine SAS HDDs and SSDs with storage tiering to cater to mixed workloads requiring both speed and storage space.
  • For high-performance, read-intensive applications: Prioritize NVMe drives to unlock maximum speed and low latency, ideal for real-time analytics and HPC scenarios.

Beyond Storage: Networking Considerations for S2D

S2D relies on robust networking infrastructure for optimal performance. Here are key considerations:

  • High-Speed Networking: Utilize at least 10GbE (Gigabit Ethernet) with Remote Direct Memory Access (RDMA) for efficient data transfer between servers in the HCI cluster.
  • Low Latency: Minimize network latency to ensure seamless communication within the cluster and maintain optimal performance.

The Power of Choice: Building Your Optimal S2D Storage Solution

The beauty of S2D lies in its flexibility. By understanding the supported storage technologies, optimization techniques, and network requirements, you can build a hyperconverged storage solution that perfectly aligns with your performance, capacity, and budget demands.

Ready to Harness the Power of Azure Stack HCI?

With its foundation in S2D and the versatility of Azure services integration, Azure Stack HCI empowers you to build a scalable and secure hyperconverged infrastructure for your modern data center needs. Explore the possibilities and unlock the full potential of your on-premises and cloud environments.

Want to Learn More?

Make Cloud Management Easy with Azure Arc

Simplify Your Cloud Management: One App to Rule Them All with Azure Arc

Juggling on-premises computers and cloud resources can feel overwhelming. Struggling to switch between different programs and manage everything efficiently? There’s a better way! Enter Azure Arc, your one-stop shop for simplifying cloud management.

Imagine this: a single, user-friendly app that lets you control all your computers – both the ones in your office and the ones you rent online (cloud). No more confusing logins or frustrating program hopping. Azure Arc takes the complexity out of cloud management, making it a breeze.

Security Concerns? Covered!

Worried about keeping your cloud safe from cyber threats? Think of Azure Arc as a powerful security shield. It extends the same robust security tools used by the massive Azure cloud to your entire IT environment. This means both your on-premises and online resources are well-protected, giving you peace of mind.
Refer for more detail: https://learn.microsoft.com/en-us/training/modules/secure-azure-arc-enabled-servers/

Say Goodbye to Tedious Tasks!

Tired of spending hours on repetitive tasks like fixing glitches and monitoring computer performance? Azure Arc has your back! It utilizes intelligent tools to automate these tasks, freeing up your valuable time to focus on more strategic initiatives.

Making Informed Decisions about Your Cloud

Ever wished you had a crystal ball to see how your computers are performing? Azure Arc acts like one! It provides valuable insights into the health and performance of your entire infrastructure, allowing you to make data-driven decisions about resource allocation and optimization.

Benefits of Embracing Azure Arc:

  • Effortless Management: Manage everything from a single, intuitive app.
  • Ironclad Security: Unwavering protection for your cloud environment.
  • Boosted Efficiency: Automate tasks and free up your time.
  • Data-Driven Decisions: Optimize your cloud resources with valuable insights.
  • Flexible Integration: Works seamlessly with your existing infrastructure.

Considering Azure Arc? Here’s What to Keep in Mind:

  • Basic Cloud Knowledge: A foundational understanding of cloud concepts is helpful.
  • Inventory Your Resources: Create a list of all your computers before deploying Azure Arc.
  • Configure Security Settings: Ensure optimal protection by properly configuring security policies.

Take Charge of Your Cloud Today!

Don’t let complex cloud management hold you back. Embrace Azure Arc and transform your cloud experience. With its unified platform, enhanced security, and time-saving features, Azure Arc empowers you to simplify management and unlock the full potential of your hybrid cloud environment. Start your journey today and become the master of your cloud domain!

Azure Stack HCI and Azure Stack portfolio

Azure Stack Portfolio: HCI, Hub, and Edge Solutions for Hybrid Cloud

The ever-evolving IT landscape demands flexible solutions that bridge on-premises infrastructure with the power of the cloud. Microsoft’s Azure Stack portfolio delivers just that, offering a range of products tailored to your specific hybrid and edge computing needs. This blog post dives into the functionalities, use cases, and implementation considerations of Azure Stack HCI, Azure Stack Hub, and Azure Stack Edge, along with a brief history of the Windows Server Software Definition (WSSD) program that laid the groundwork for these innovative solutions.

A Legacy of Innovation: The WSSD Program

Before exploring the Azure Stack family, let’s rewind to the Windows Server Software Definition (WSSD) program. Launched in 2016, WSSD aimed to simplify on-premises deployments by offering pre-configured software stacks optimized for specific workloads. This program paved the way for the modular and adaptable approach that characterizes the Azure Stack portfolio.

Azure Stack HCI: Hyperconverged Powerhouse

Azure Stack HCI is a hyperconverged infrastructure (HCI) solution that seamlessly integrates compute, storage, and networking resources into a single, software-defined cluster. This powerhouse caters to organizations seeking to:

  • Modernize their datacenters: Azure Stack HCI offers a scalable and cost-effective way to refresh virtualization infrastructure by leveraging a hybrid approach with built-in Azure integration.
  • Consolidate workloads: Run both virtualized and containerized workloads efficiently, streamlining management and optimizing resource utilization.
  • Empower remote offices: Deliver robust infrastructure for branch locations with simplified deployment and management capabilities.
  • Support demanding workloads: Azure Stack HCI handles high-performance workloads with ease, making it ideal for data analytics, virtual desktops, and other resource-intensive applications.

Considerations for Azure Stack HCI Implementation:

  • Existing infrastructure: Assess compatibility with Azure Stack HCI’s hardware and software requirements.
  • Workload needs: Identify the workloads you plan to migrate or deploy to ensure optimal performance.
  • Management expertise: In-house IT teams should possess the necessary skills for deployment and ongoing management.

Azure Stack Hub: Your On-Premises Azure Cloud

Azure Stack Hub brings the power of Azure services directly to your datacenter, enabling you to build, deploy, and manage hybrid applications in a familiar Azure environment. This solution is ideal for organizations with:

  • Strict data residency requirements: Azure Stack Hub allows you to keep sensitive data on-premises while still benefiting from Azure’s development and management tools.
  • Limited or unreliable internet connectivity: Deploy and run applications locally without relying on a constant internet connection.
  • Hybrid application needs: Azure Stack Hub bridges the gap between on-premises and cloud-based resources, fostering seamless application development and deployment.

Considerations for Azure Stack Hub Implementation:

  • Security expertise: A strong understanding of security best practices is crucial for managing an on-premises cloud environment.
  • Resource allocation: Carefully plan resource allocation to ensure sufficient capacity for your intended workloads.
  • Ongoing management: Dedicate resources for ongoing management tasks like patching and updates.

Azure Stack Edge: Intelligence at the Edge

Azure Stack Edge extends Azure intelligence to the edge of your network, enabling local data processing, analytics, and filtering. This solution is perfect for scenarios involving:

  • Limited bandwidth: Process and analyze data locally before sending it to the cloud, reducing bandwidth consumption.
  • Disconnected environments: Ensure continuous operations in remote locations with limited or no internet connectivity.
  • Real-time decision making: Perform real-time data analysis at the edge, enabling faster and more informed decision-making.

Considerations for Azure Stack Edge Implementation:

  • Network connectivity: Evaluate network bandwidth and latency to determine if local processing is necessary.
  • Data security: Implement robust security measures to protect sensitive data processed at the edge.
  • Device management: Establish a plan for ongoing device management and updates.

Conclusion

The Azure Stack portfolio empowers organizations to harness the power of hybrid and edge computing. By understanding the functionalities, use cases, and implementation considerations of Azure Stack HCI, Hub, and Edge, you can make informed decisions about the right solution for your specific needs. As cloud adoption continues to rise, these innovative offerings provide a future-proof approach to managing your IT infrastructure.

×